
Have you ever thought of printing your iPhone photos?
If you remember the photos that early iPhones took, you’re probably shaking your head and laughing.
iPhone photos have come a long way.
In 2008, I bought my first iPhone. I wasn’t interested in the two-megapixel camera that came installed on it. What I wanted was a phone that would work internationally.
A few weeks into owning it though, Skip and I were driving to Charleston, South Carolina when, suddenly, I started seeing signs along the highway alerting us to an upcoming attraction. I couldn’t believe my eyes! Could this piece of Americana still be around? I groped around for my DSLR, only to realize that it was way out of reach in the back of our SUV.
Then, I remembered that my new iPhone had a camera. In only a few moments, I had figured out how to use it and was snapping away through our windshield. What I shot wasn’t art and it wasn’t printable, but I was still thrilled to have a photo of this famous roadside attraction that I could show friends.
You can always edit your photos with new software!
If you have old iPhone photos that mean a lot to you and that you wish you could print, don’t delete them. Software continues to improve and you may very well be able to save your photo.
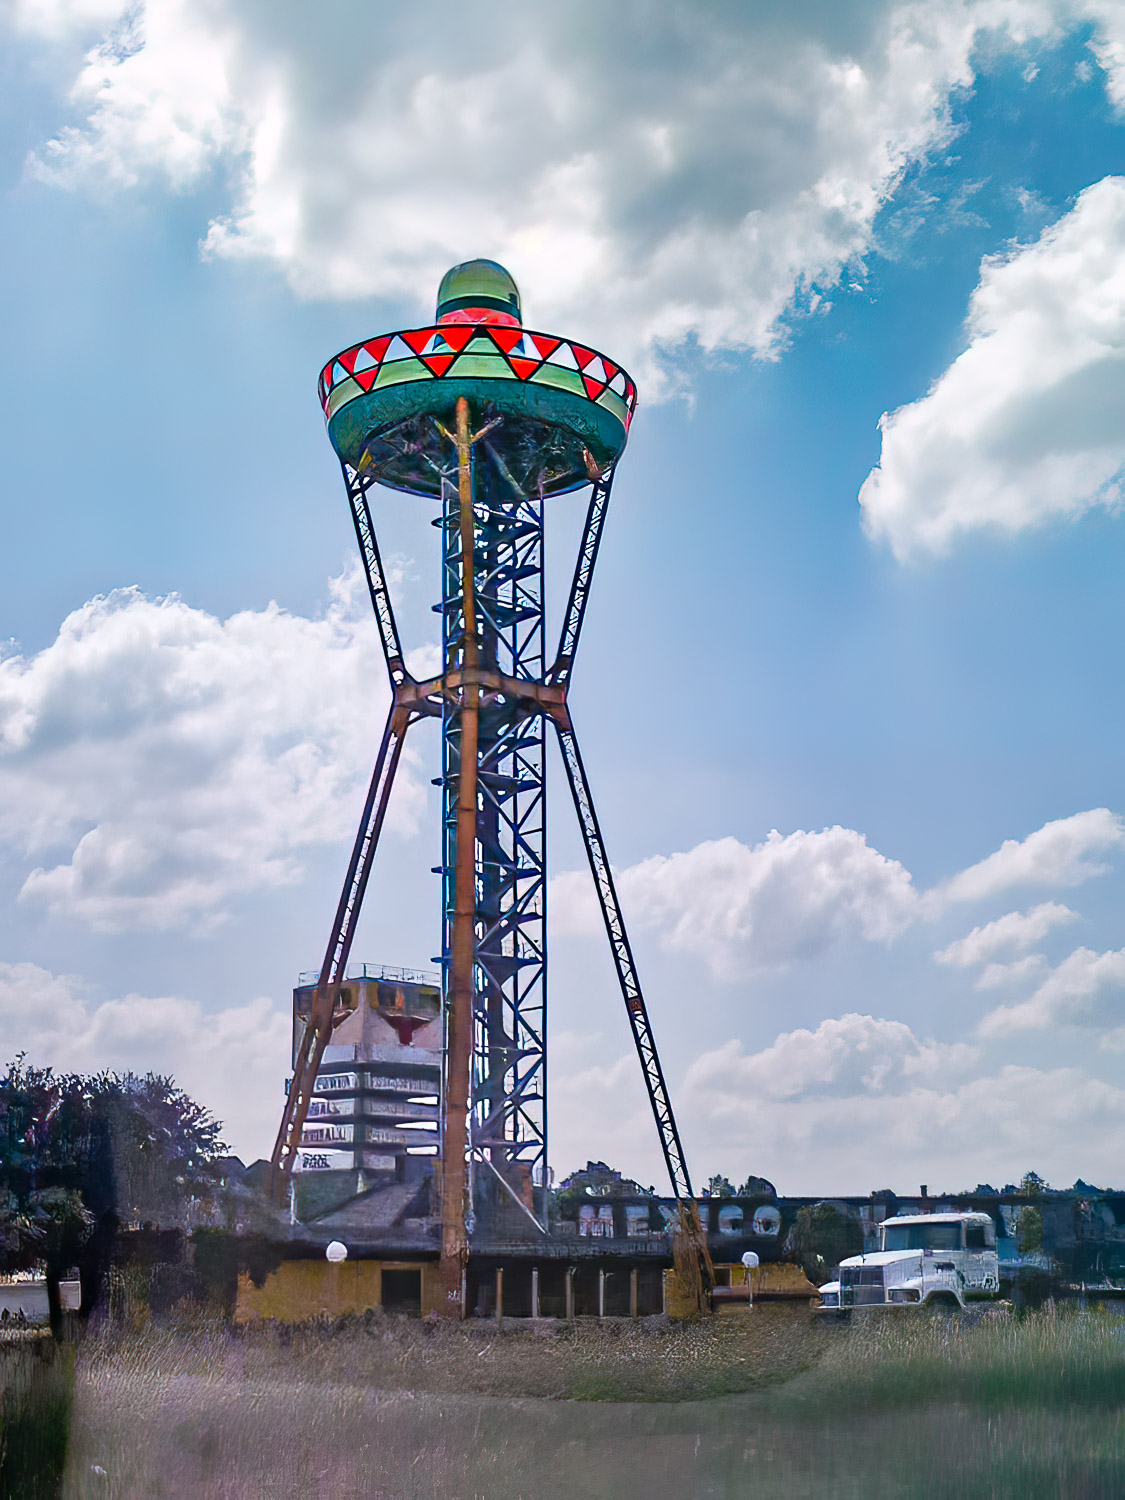
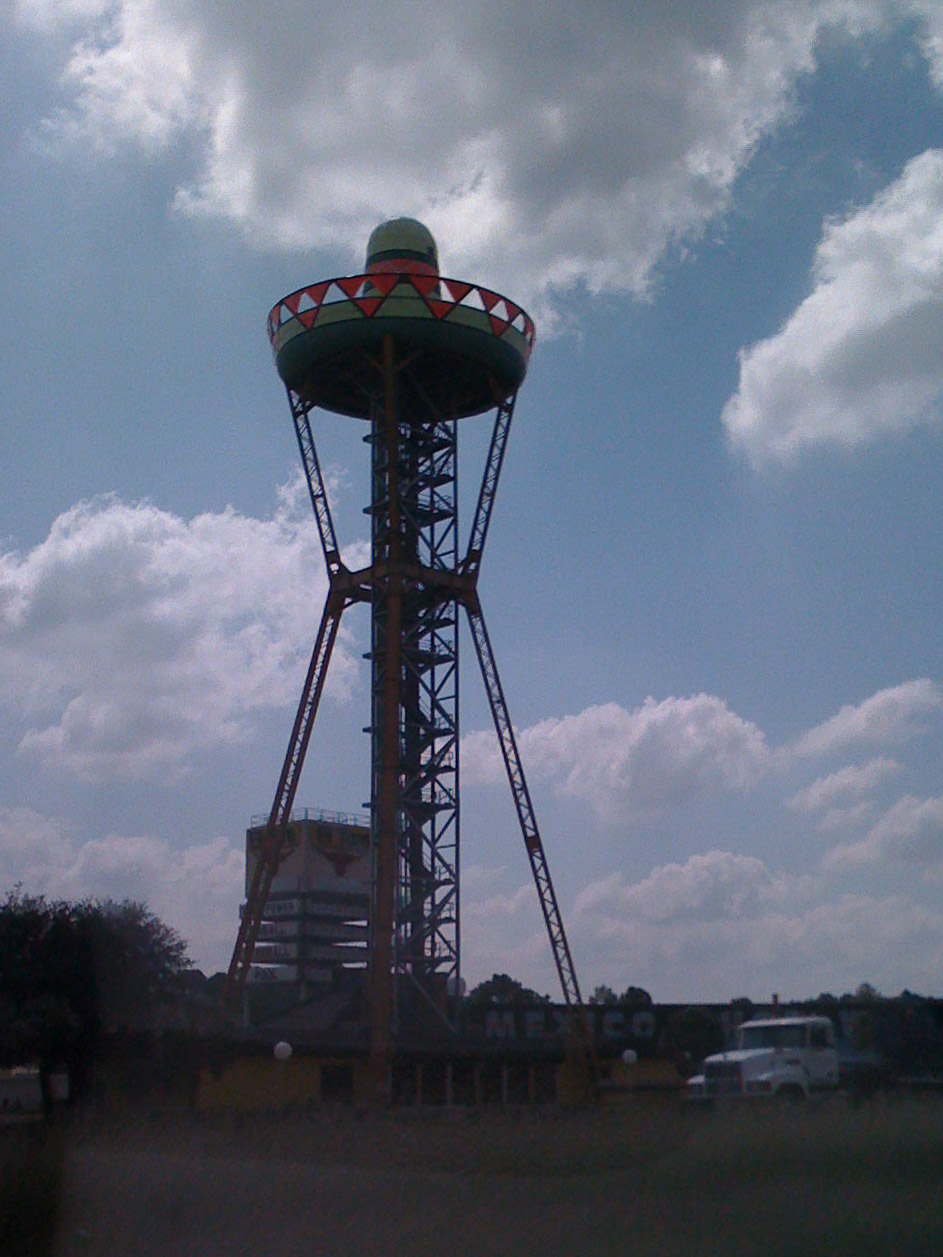
Here’s a pretty ugly example. This is the photo of a tower at South of the Border in Hamer, South Carolina that I mentioned above. It was one of the first photos I ever took with an iPhone. Which one? Just a plain old iPhone with no model number!
I shot it through the car windshield as we drove by. Then, I cropped it to half its original size, down to one megapixel, since that iPhone didn’t have a zoom lens.
For fun, as I wrote this post, I thought I’d try to edit it with modern software. Slide back and forth to see the original underexposed photo and the newly edited version. I used Lightroom Classic, Topaz DeNoise AI and Topaz Gigapixel AI to do the editing. Believe it or not, with the resizing that Topaz Gigapixel AI did, I could print this iPhone photo at 11 x 14-inches today. It would still be an ugly snapshot, though! 🤣
Welcome to 12 MP photos
Today, the iPhone camera is so sophisticated that we refer to our iPhones as cameras instead of phones. Real art is being shot with them and iPhone photos now appear on magazine covers and in full-page spreads in newspapers.
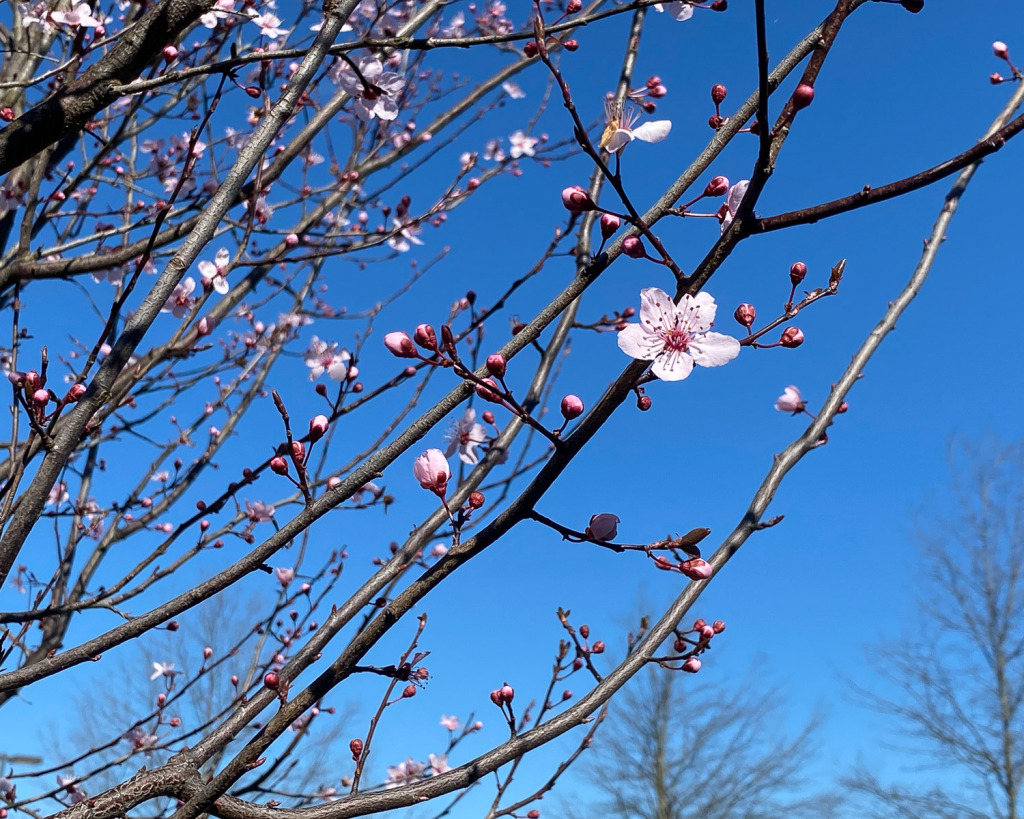
You’ll be surprised at how good they look and how large you can print them. I printed this iPhone photo of a single cherry blossom on a warm January day, and it won the People’s Choice Award at a local art gallery. I shot it with the iPhone 11 Pro.
Since 2015, when the iPhone 6S and 6S Plus were released, most iPhone models have had a 12 MP camera. That’s big enough to easily print a 12 x 16-inch photo!
Two tips to help capture print-ready photos:
Tip #1:
Shoot in JPG. Here’s how: Tap on the Settings app on the Home screen of your iPhone. Scroll down to Camera and tap on it. Now, tap on Formats, right at the top. At the top of the page that opens, you’ll have two choices under Camera Capture: High Efficiency and Most Compatible. Tap on Most Compatible.
This will set your iPhone camera to shoot JPGs instead of HEICs. Ignore the file-name jargon for now. Just know that JPGs are universally accepted for printing and the new HEIC files are not.
Tip #2:
Zoom with the lens on your iPhone and not with your fingers. To do this, open the Camera app and tap on the “2” or “3” floating over the scene, towards the bottom of the screen. The number will depend on your iPhone model. The “2” signifies a zoom lens that doubles the magnification. The “3” lens triples the magnification. This is an optical way to zoom, using lenses.
Why should you avoid zooming with your fingers? If you’re not sure what I mean, it is possible to zoom by tapping and holding on an iPhone screen with two fingers close together and then spreading them while still holding. The reason to avoid this is that you are creating a digitally-zoomed photo. You’ll end up with a poorer quality result.
Of course, if possible, you can always zoom with your feet! Just walk up closer to your subject.
Capture more interesting iPhone photos to print.
Experiment with the various settings that come with your iPhone camera. Here are two that can help create an artistic photo.
Live Mode:
If you are shooting something that is moving, experiment with Live Mode. Hold your iPhone absolutely still while you shoot, because the camera will be shooting a three-second exposure. Then, in the Photos app on your iPhone, tap on the Live icon at the top left and choose Long Exposure from the drop-down menu. This is how I shot the waterfall below.

To keep the iPhone still enough, I propped it on a rock while I held it. A small tripod would have worked even better. It’s important to have parts of the photo in perfect focus without blur. That way, the blurred water stands out.
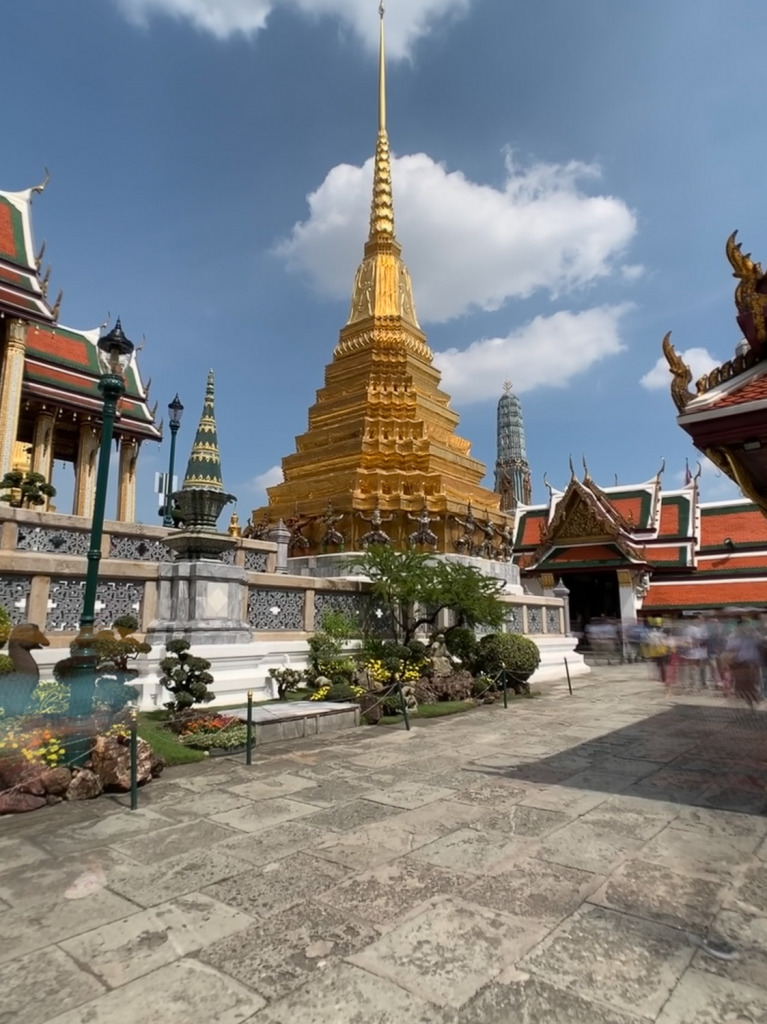
You can also make people disappear this way if they are moving quickly. That’s how I took the photo of Wat Phra Si Rattan Satsadaram in Bangkok without tourists in the photo. Two of them walked right through the scene while I took the photo.
Portrait Mode:
Portrait Mode isn’t just for people! It takes photos with a very shallow depth of field. Even better, you can adjust the depth of field afterward in editing in the Photos app. Then, you can print your iPhone photo and people will think you took it with an expensive DSLR!

There are also different lighting effects you can apply to the photo. Try those out, too.
Bonus tip:
If you are emailing your photo to someone else to print, you may be given a choice of the size photo you want to send. Always choose Original Size. Otherwise, you’re sending a compressed photo that may not be printable.
Don’t be afraid to experiment when you print your iPhone photos.
If you own a Canon or Epson printer, you have the perfect setup for experimenting with printing. Be sure to buy photo paper from the same manufacturer. In other words, buy Canon paper for a Canon printer and Epson paper for an Epson. Avoid other papers. If it’s store-brand paper, like Office Depot, the colors will often be wrong. Both Canon and Epson offer different types of photo paper.
If you get excited about printing yourself, you may want to invest in a photo printer. I use the Canon Pixma Pro-100 and love the results. I can print up to 13 inches wide. For anything larger, I send the photo to Bay Photo.
Now it’s your turn:
Take some photos you’d like to print with your iPhone and challenge yourself to make some prints this week. You can also order prints online. Let me know how it goes in the comments!
If you’d like to learn more about shooting in Portrait Mode on your iPhone, check out this post.
To learn about shooting with Live Mode on your iPhone, check out this post.
To learn more about printing, you can buy Matt K’s Printing class. It’s full of valuable information about printing at home and is well worth the investment.
You might also like


2 Comments
A very interesting – and useful – article. Thank you
Thanks, Chris! Have you tried printing your iPhone photos? I have one hanging in a gallery right now. It’s hard to believe that a mobile phone can take such incredible photos.