
When you arrive at a landmark and pull out your camera, do you experience imposter syndrome, that nagging feeling that all the good photos of Notre Dame or The Washington Monument, or any other famous location have already been taken? How can you set your photo apart? How can you improve your landmark photos and shoot something that is original to you?
The fire hydrant lesson that will help you improve your landmark photos
In a photography class I took many years ago, the teacher challenged us to take 20 different photos of a fire hydrant. Now, a fire hydrant isn’t a landmark, but the challenge applies to all kinds of photography. She was asking us to use our imagination, get out of our comfort zone and explore. Lying on the ground to shoot straight up at the fire hydrant? Done!
So, how can you apply this lesson to landmark photography? Here’s my approach. When I arrive at a scene, I go ahead and take the “hero shot.” That’s basically a copy of the famous photos of the landmark, the ones you see on postcards. I get it out of my system. Then, I look around to see how I can use my body to change the photo.
Use your body to improve your landmark photos.
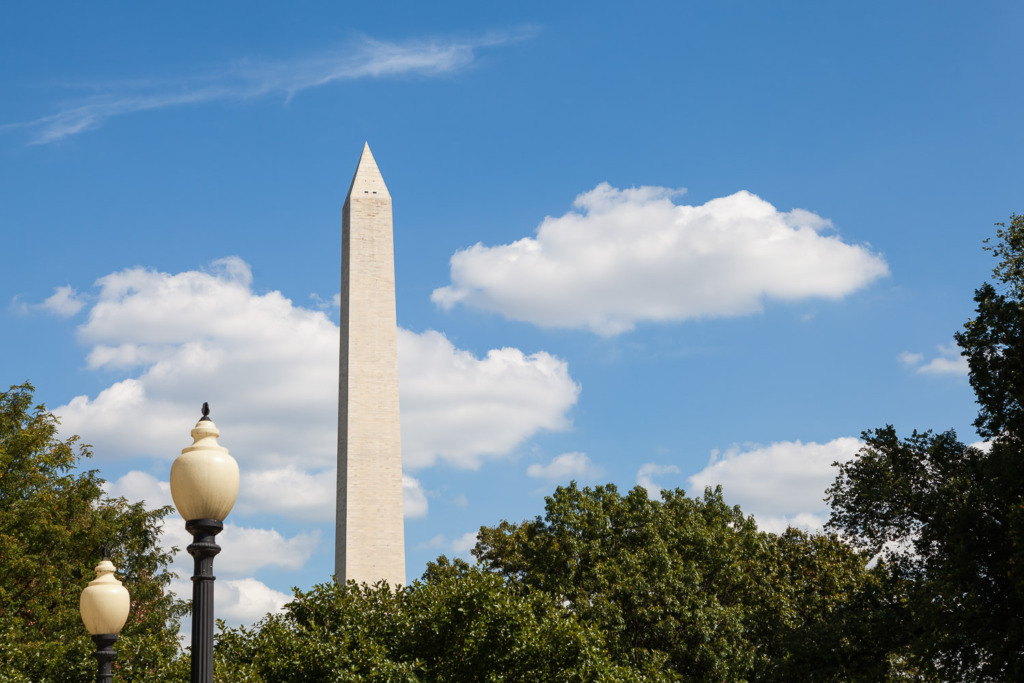
For this photo of the Washington Monument, I took a walk around the area, looking for a different angle. One of the advantages of scouting an area is that you get to see much more. When I found this clump of trees, I could imagine the possibilities. I moved around looking back at the monument, until I could line up the two lamp poles in the foreground. It’s an uncommon photo of the monument.
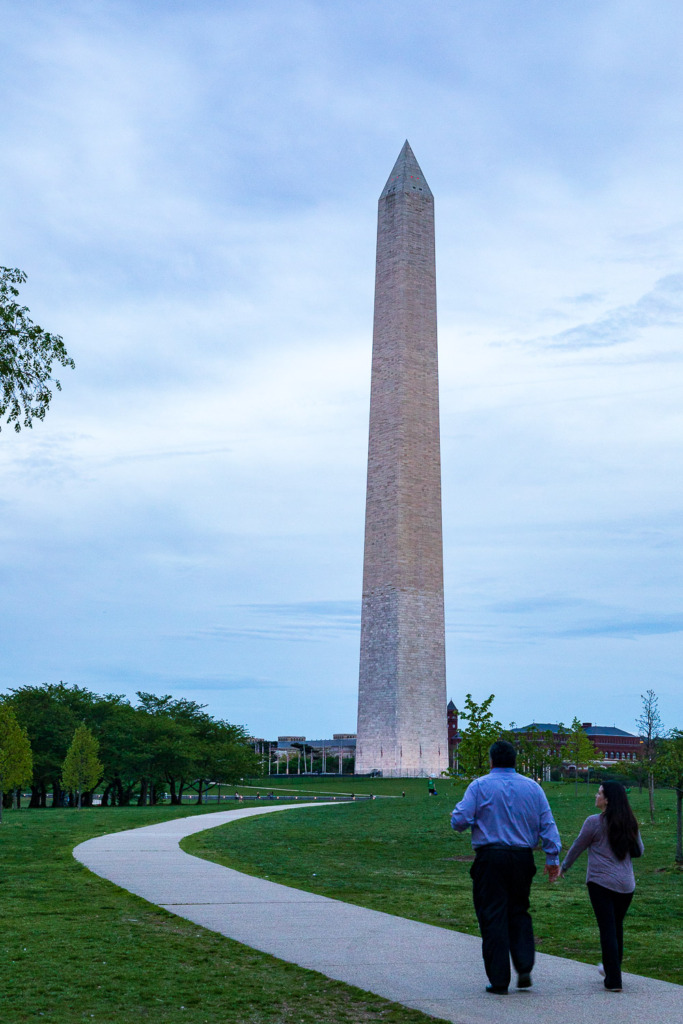
Later in the day, I saw a chance to include a curving leading line in a photo of the Washington Monument. I took two versions of this shot. The first was just of the curving walk leading toward the monument. I thought it was great. Then, a couple walked into the scene to add a human element and movement. Perfect!
Finding a new angle in Paris
Taking a unique photo of Notre Dame (prior to the tragic fire) is a fun challenge. Because it is located on an island in the middle of the Seine, you can take photos from many angles. It’s the perfect place to practice improving your landmark photos.

For this photo, I was out for a Sunday afternoon stroll. As I approached the Pont de l’Archevêché, I was drawn to all the activity. There were so many stories in the scene. I particularly liked the woman having her portrait painted holding a bright green umbrella. Including the back of Notre Dame ensured that the viewer would know exactly where I was and give them a feeling of a Sunday afternoon in Paris.
Improving your landmark photos with a walk around the Eiffel Tower
How many photos are there of the Eiffel Tower? Can you even imagine? How do you capture a photo that doesn’t look like a postcard?
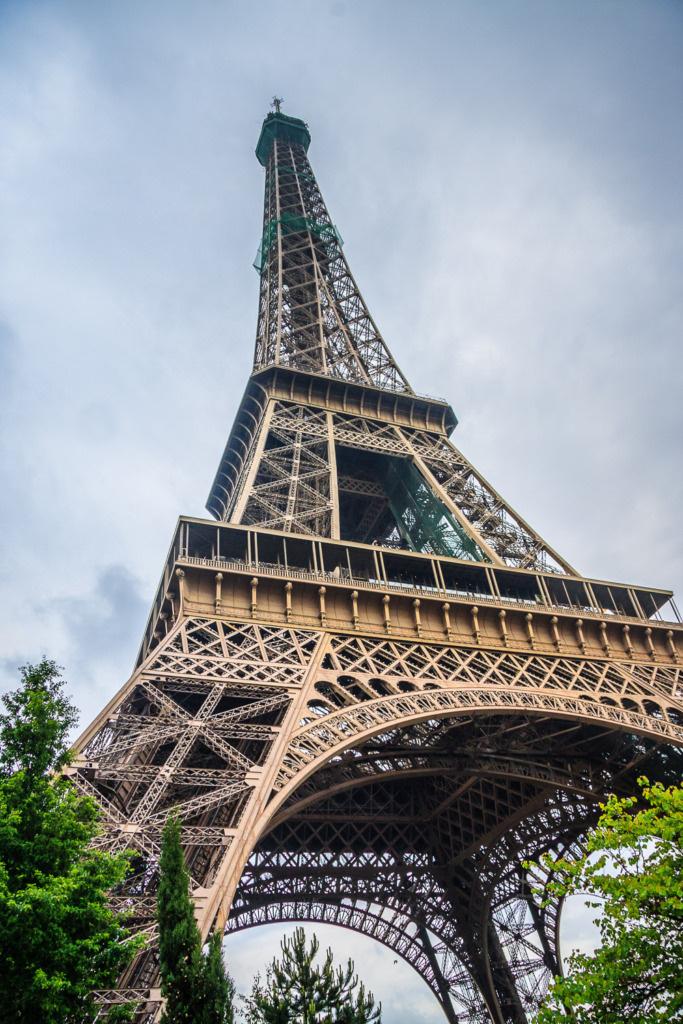
I took this photo on a very happy trip with our daughter. She joined us in London while Skip was working there on a case. For fun, we decided to ride the Euro Star to Paris for lunch and a day of sightseeing. The trip came with a ticket for a hop-on, hop-off tour bus. At the Eiffel Tower, we left the bus to explore.
As we walked past the base of the tower, I looked up and saw this angle which really emphasized the height. After moving around for a few minutes, looking for a good view, I got this shot. It’s one of my favorite photos of the Eiffel Tower.
Taking twenty photos (really many more…) of the Great Wall of China
Another way to improve your landmark photos is to spend time with other photographers. On a trip to China with a group of photographers, we managed to spend most of an hour in one section of the wall. Every time you thought you’d captured everything there was to take, you’d notice one of the other photographers shooting something you hadn’t even noticed.
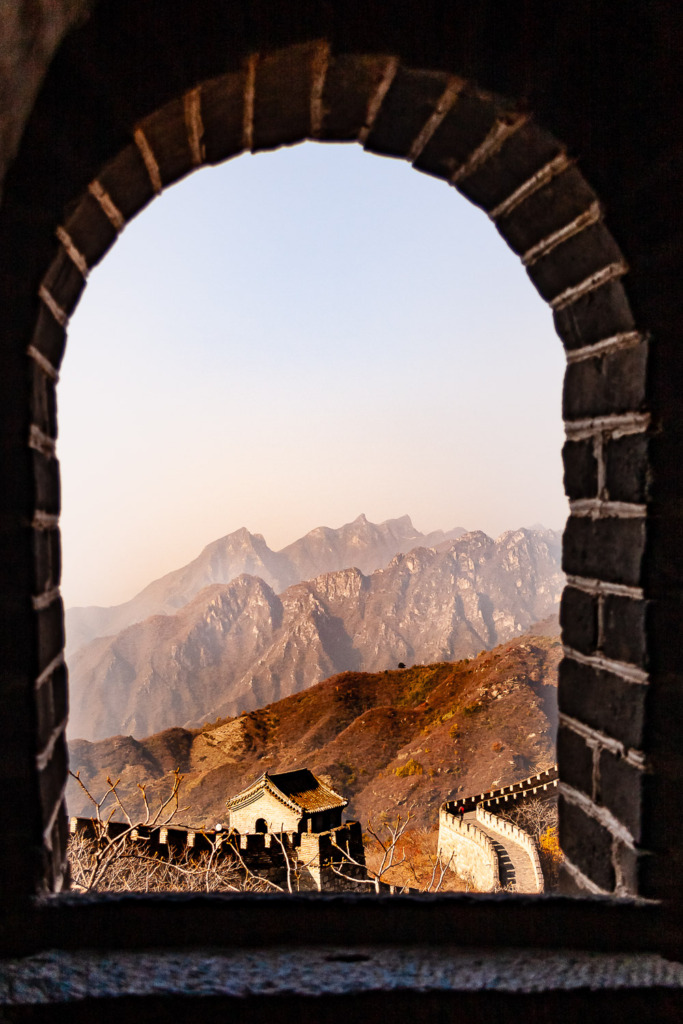
I have to give credit to Joe Swick for this photo. He was spending a lot of time inside this particular tower. When I climbed up to it, I could see why. Out of the opening in the side of the tower, you could see more of the wall in the distance. I backed up far enough to include the stones of the opening as a frame and captured this shot.
Have you revisited your landmark photos recently?
Here’s another tip. Revisit your landmark photos from time to time. I shot this photo in 2008. Fortunately, I shot it in RAW and kept the original file in my Lightroom catalog. (At the time, Lightroom was only a year old and Lightroom 2 had just been released!) When I processed the photo in 2008, the stones around the opening were very dark with few details. Recently, I went back to the photo to see what details I could discover with a newer version of Lightroom. Wow! So many details were in the RAW file, just waiting to be revealed. I’ll definitely revisit it again sometime in the future. Photo software continues to evolve.
Moving a few feet can make a huge difference.
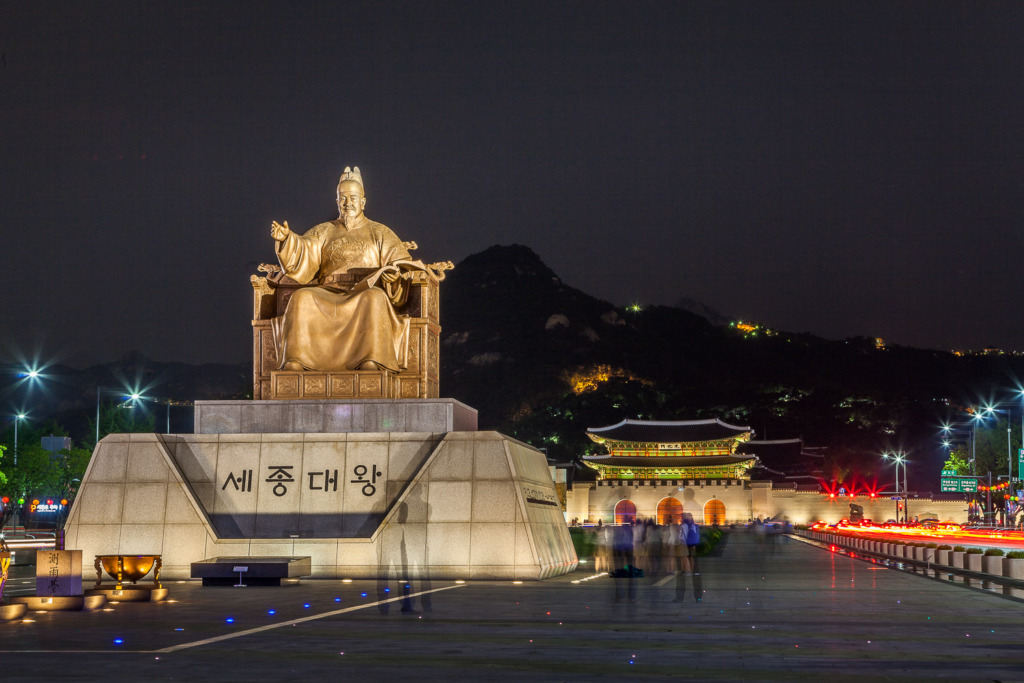
Most of the photos I’ve seen of the statue of King Sejong in Seoul are shot straight on. I was out with my camera and tripod one evening, playing around with slow shutter speeds to make people disappear. I took a photo of the statue, standing right in front of it. Then, I followed the Fire Hydrant Rule and started moving around. What an amazing difference a few feet made! It can really improve your landmark photos.
I was able to capture both the statue and also Gwanghwamun Gate in the distance. Two landmarks in one photo! I was using a very small aperture of f/16 to allow a slow shutter speed of 25 seconds. That helped most of the people disappear entirely. If you look closely, you’ll notice a few ghost-like forms. Those are the people who lingered in the scene. An advantage of that small aperture was that it allowed both the statue and the gate to be in acceptable focus. The starbursts formed by the lights were an extra bonus.
I’d managed to capture an unusual photo of a landmark by moving a few feet to the side.
Ready to try?
To see some more examples of landmark shots and how I captured them, click here:
https://www.carolinemaryan.com/add-dimension-with-water-reflections/
To read more about trying different camera angles to improve your photography, click here:
https://www.carolinemaryan.com/camera-angle-a-photographers-secret/
Wondering where to stay in Washington, DC, while you’re practicing the Fire Hydrant Rule and improving your landmark photos? I love staying at the Kimpton George Hotel, near Union Station.
Its location is really convenient and its ambiance is perfect after a day of shooting photos. They make you feel like family. Plan on enjoying their complimentary happy hour.
Be sure to grab lunch or dinner at Bistro Bis, located in the hotel.
And stretch and relax your photographer’s back and neck with a few minutes of yoga right in your room. Every room comes with a yoga mat!
You might also like


Leave a reply