Since Zoom meetings are a lot like photoshoots, these seven Zoom meeting tips from a photographer should help you rock your next video conference and look great!
Rule number one: place your head near the top of the screen.
Don’t waste valuable space! This is a mantra of portrait photographers and an easy way to pick out amateurs. The top of your head should be positioned near the top of the screen. Depending on how close you are to the camera, this will provide room for your shoulders or even your upper body to be included.

I took a quick iPhone shot of my TV screen to demonstrate this. The photo is of the PBS NewsHour and the people you see are, from left to right, David Brooks, Judy Woodruff and Jonathan Capehart. You’ll notice that all three people are following rule number one.
Rule number two: whatever is closest to the camera will look the largest, so position the camera close to eye level.

This is a photo of a perfectly normal zebra that I shot in Tanzania. There is an important lesson here for people appearing in front of a camera or webcam on their computer. You don’t want to look like this! 😩 But, if you position your laptop camera in the wrong place, or wear stripes, this may very well be you.
I shot this photo with a wide-angle lens, at 31mm, and the zebra was close to the safari truck. Wide-angle lenses can create this distortion of objects that are close. Fair warning: The camera lens on your computer or laptop is also a wide-angle lens, and you will be sitting close to it.
The solution is to place your camera at or near eye level.
If it’s below your chin, your neck will be larger than your eyes. Even worse, you’ll be looking down and that can do some pretty ugly things to your chin. 😬 If you’d like to demonstrate this for yourself, take a selfie with your mobile phone, holding it at chest level. Hmmm. Not so great. This is why you see people taking selfies with the phone held slightly above their heads.
There is one problem with placing the camera above your eyes, and that is that your forehead will look much bigger than your chin. Even worse, your upper teeth won’t be visible when you talk, unless you spend your time on the video conference tilting your head up at the camera.
Who knew this to could be so complicated?
Preparation is everything!
One of the best Zoom meeting tips this photographer can give you is to play around with the best height for your camera beforeyour meeting, to see exactly how high it should be. People’s face shapes vary. You want to find the most flattering angle for your face and body. On Zoom, you do this by signing into Zoom early, before you click on the meeting link.
Will you need to type during the meeting?
If you need to type, the best solution is to get a mouse and a keyboard for your laptop. If you are using a desktop computer, you can skip this step, because you already have them. 👏
Rule number three: your clothes do make a difference.
Stripes or busy prints are rarely a good idea. Remember the zebra? Stick to something plain. Here’s a funny article about Zoom shirts from the New York Times.
Yes, there really is such a thing! If you have more time to go down the rabbit hole of Google searches, you can type “zoom shirt” into the search bar. It’s a whole new industry!
Rule number four: lighting is everything.
What do a Zoom meeting and a head shot have in common? They are both designed to present you in the best possible light. (Sorry… photographer joke 😎) Photographers know this. Now it’s your turn to test it out. Turn on Zoom and take a good look at yourself. Do you disappear into the background? Or reflect the blue color of your screen? It’s important to avoid really bright light behind you. Your camera will try to balance the exposure and you’ll end up too dark or even blue.
If you have a window behind your computer and you’re Zooming during daylight hours, you may be fine with natural light. Otherwise, try to place a lamp in that position. The best solution that I’ve found is the Lume Cube Video Conference Light.
It attaches to the top of your screen with a suction cup. You can control the brightness and even the color temperature. If this all seems too complicated, just try the different settings on the Lume Cube until you like how you look!
Rule number five: test to see what else is in the picture.
As you can see, I’ve spent my summer on the lookout for TV examples. Since many reporters have been working from home, this is a great place to do your research.
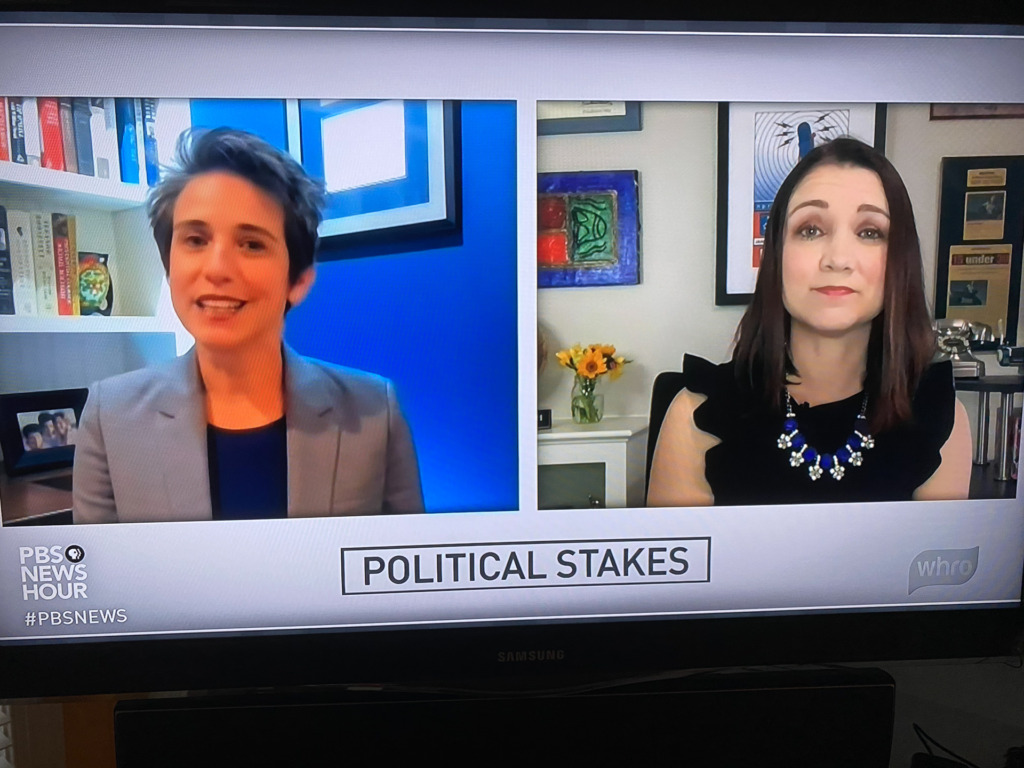
In this shot of Amy Walter and Tamara Keith from the PBS NewsHour, take a look at Amy on the left. While she is sitting in front of a picture on the wall and there are books, etc. on the shelves, none of it is taking your eyes away from her. On the other hand, Tamara, on the right, is sitting in front of a picture that features a microphone. You can see the entire piece of art on most broadcasts, and it doesn’t detract from her. On this particular night, however, she has positioned herself in front of the picture. The microphone looks like an antenna broadcasting right out of her head. Awkward!
Your job? Scan all four corners of the shot/screen to look for distractions. Then, either remove the distracting items or move your laptop or yourself.
The most important Zoom meeting tip from a photographer? (Rule number six)
When you are speaking, look straight at the camera lens, not the other attendees. Think of this like a head shot. If you were posing for an official portrait to put on your LinkedIn profile, you would look at the camera because this exudes confidence. While it is so tempting to watch the other attendees’ faces as they react to what you are saying, this makes you look unsure of yourself or even like you are hiding something. Don’t look like a kid caught with a hand in the cookie jar.
If you wear progressive glasses (the kind with reading magnification at the bottom), beware of tipping your head back to see the screen. The other participants will have a great view up your nose.
Rule number 7: position your screen horizontally.
While you can participate in Zoom meetings on your tablet or even your mobile phone, there is one caveat. When using your tablet or mobile phone, be sure to position your device horizontally, like you would watch a movie. And, brace your device in front of you. Don’t hold it, unless you are giving the other attendees a walking tour.
Why is there a beautiful shot of a zebra at the very top of this post?

Here’s a full-sized shot of the panorama at the very top of this post.
Oh. You thought this was a blog post about Zoom meeting tips from a photographer? What’s with the zebra? Forgive me. I’m the photographer, and I needed to include a good shot of a zebra! I took this in Tanzania, in the Ngorongoro Crater.
If you’re curious about what else I shoot, you can learn about it in this post
Better yet, be sure to sign up for my newsletter to learn when I will be launching my new online version of my signature photography workshop!
Now, it’s your turn.
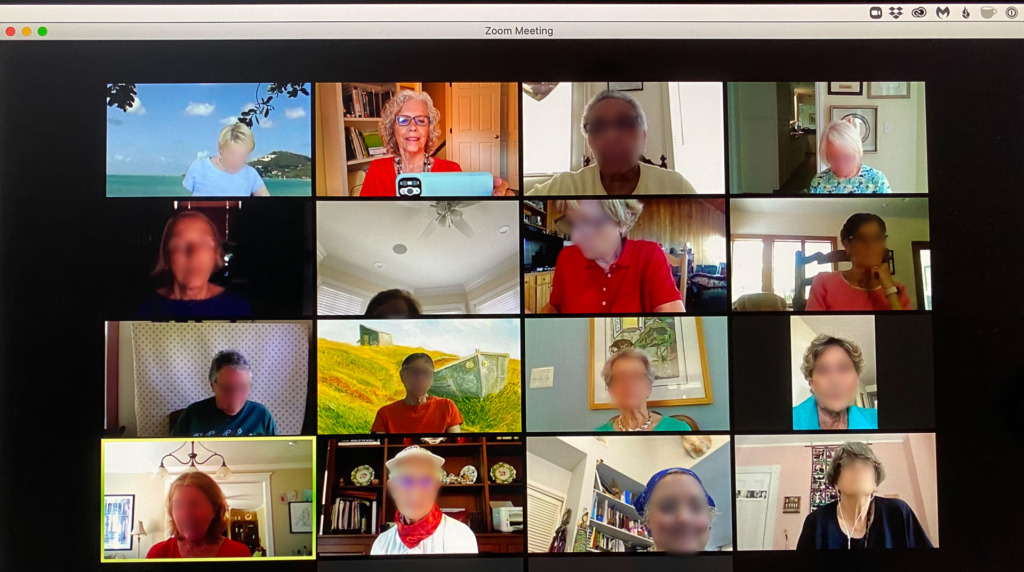
Here’s a photo I took of a Zoom meeting I attended earlier this summer. To protect the innocent, I’ve blurred all the faces but mine. I did tell them I was taking a picture. Now, see how many mistakes you can find. Since I did a fairly major job of blurring, you may have trouble seeing who is wearing glasses. A head tilted back is a pretty good indicator. My personal favorite? The second from the left on the second row. Hmmm.


2 Comments
Hi, Caroline. This is all really helpful. I found this post because I noticed while watching the PBS News Hour tonight that Jonathan Capehart was so much clearer to the viewer than David Brooks or Judy and googled to see if I could find out why . . . which brought me here. Is it because of his computer’s camera or something else? Also, I agree about the backgrounds for Tamara and Amy above, but think that Tamara’s coloring comes off better than Amy’s on this particular night. Any idea why that is? Thanks!
Hi Linda, it’s great to hear from a fellow PBS News Hour fan!
Your question really inspired me to do some research. First of all, my guess is that Jonathan has a better webcam. But, I wasn’t sure about the settings that exist on Skype, so I launched it on my computer. I thought David might have fooled around with them.
There is a setting that allows you to blur the background, but not the face. When I tried out the background-blurring setting, I suddenly understood some of the videos I’ve seen that are really bad. The AI couldn’t tell the difference between my hair and the bookshelf behind me. 😬 Not good.
But, since there is no setting to blur the face, I think we can assume that David’s camera is just not as good as Jonathan’s.
Zoom does have a setting to soften the face. It drives me crazy when I watch an interview in which the person’s face is slightly blurry but the background is totally in focus, so I’m not a fan of it.
Finally, the lighting difference is due to the color temperature of the lights that are being used. Judy uses a light that’s set to a really warm setting. Tam is sort of in the middle. And Amy tends to use a cooler (bluer) temperature setting. This week, it looked sort of odd, due to the small light she’s added to the bookcase to light up Gwen’s photo. It’s really warm.
I’ve really enjoyed seeing the differences due to the reporters working from home this year. I’ve also become a big fan of the cats that appear in Lisa and William’s reports.
Take care and thanks for the question!