
How to fix dark snow photos is something almost every photographer must learn the hard way. You step outside after a fresh snowfall, and everything looks magical. Sparkly. Bright. Like a winter postcard. You grab your camera (or your iPhone), snap a few photos… and when you come back inside?
The snow looks gray.
The whole scene feels dull.
And you think, “Wait. It didn’t look like that!”
Here’s the good news: you didn’t mess up.
And some even better news: once you understand why snow photos look dark, they’re incredibly easy to fix.
- Why Snow Photos Look Dark
- How to Fix Dark Snow Photos Using Exposure Compensation
- How to Set Exposure Compensation on a DSLR or Mirrorless Camera
- How to Fix Dark Snow Photos on an iPhone
- How to Fix Dark Snow Photos After You’ve Already Taken Them
- How Learning to Fix Dark Snow Photos Will Help at the Beach (and Beyond)
- One Important Warning When You Fix Dark Snow Photos
- Now It’s Your Turn ❄️
Why Snow Photos Look Dark
If you want to know how to fix dark snow photos, you first need to understand why it happens.
Cameras have an internal light meter. Its job is to measure the light in a scene and choose what it thinks is a “correct” exposure.
But here’s the catch:
Your camera assumes the world averages out to middle gray. In other words, in a perfect world, the light meter assumes that half the pixels in the photo will be dark and half will be light. Right in the middle is middle gray.
But a snowy scene is full of light, so the photo of it should have many more light pixels than dark pixels.
So, what happens?
When you point your camera or iPhone at a field of bright white snow, it gets confused and darkens the image, and your beautiful white snow turns gray.
The camera’s not broken. It’s just doing math. 😉 And it’s your job to set it straight.
How to Fix Dark Snow Photos Using Exposure Compensation
[s201_bai id=”39″]
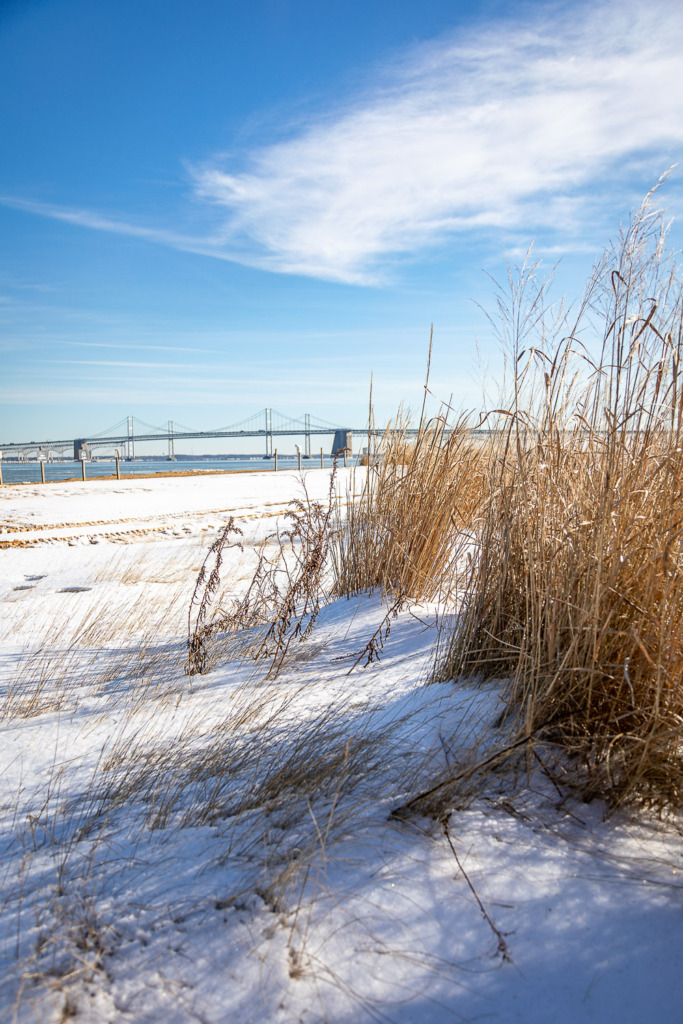
The fastest way to fix dark snow photos is by using Exposure Compensation. This feature lets you override your camera’s light meter.
You’re basically saying, “Yes, I know you think it’s bright enough. But it’s snow, so make it brighter anyway.”
I shot the two photos above with my iPhone 17 Pro Max. The darker photo was taken at the iPhone’s perceived good exposure. The snow had fooled it. After I took it, I took a second one, adding +2 stops of exposure compensation. Much better!
How to Set Exposure Compensation on a DSLR or Mirrorless Camera
If you’re using a DSLR or mirrorless camera, here’s exactly what to do.
First, get out of Auto Mode. (You knew that was coming. 😉)
Switch to:
- Program (P)
- Aperture Priority (A or Av)
- Shutter Priority (S or Tv)
If you’re not sure about using these modes yet, choose Program Mode.
Then:
- Find the +/- button.
- Turn the dial toward the + side.
- Start at +1.
- Take a test shot.
- Increase to +1.3, +1.7, or +2 if needed.
Mirrorless shooters get a bonus. You can actually watch the image brighten in real time on your screen or in your viewfinder.
Quick Nikon note: Some older models reverse dial direction. Just make sure you’re increasing into positive numbers.
Quick Canon note: Some higher-end Canon cameras don’t have a +/- button. Instead, you’ll lightly tap on the shutter button to wake up the light meter and then turn the large dial on the back of the camera. You need to turn the dial within about three seconds.
How to Fix Dark Snow Photos on an iPhone
You can fix dark snow photos on your iPhone, too. (Yes, even the newer iPhones, with their amazing built-in AI, may underexpose your snow photos.)
Here’s how:
- Open the Camera app.
- Tap on your subject. (You’ll see a yellow icon appear where you tapped.)
- Slide your finger up on the sun icon.
Watch the snow brighten, and stop when it looks white, but still textured. Now take your photo. This will only lighten the next photo you take. You have to repeat the process with every shot.
If you want to take a series of photos in the snow without having to slide up on the screen before each photo (like when you’re capturing your kids on the perfect sledding run down a hill, or your dog leaping around the yard, or your friend doing snow angels), you can set the exposure compensation on your iPhone camera.
Here’s how:
- Find the Exposure button on the Camera screen. You’ll need to study your iPhone model to see where it’s located. It’s a button with a + over a -.
- Tap on that button. A slider will appear on the screen.
- Slide your finger to the left on the slider. This will change the exposure compensation until you unset it.
How to Fix Dark Snow Photos After You’ve Already Taken Them
There’s more magic! All is not lost if you’ve already taken your fabulous but too-dark photos.
You can often fix dark snow photos in post-processing, and it’s not as scary as it sounds!
If you’re an Apple fan, in the Photos app on your iPhone, iPad or Mac:
- Open the Photos app and tap Edit (Photos app on Mac) or the edit icon, which is three horizontal lines with circles on them (Photos app on iPhone)
- Increase Exposure
- Brighten Shadows
- Lower Highlights slightly if needed to recover detail in the snow.
In Lightroom or other editing software (good for all photographers):
- Increase Exposure
- Lift Shadows
- Reduce Highlights or Whites if the texture disappears
How Learning to Fix Dark Snow Photos Will Help at the Beach (and Beyond)
Here’s the fun part. Once you know how to fix dark snow photos, you’ve unlocked a bigger skill.
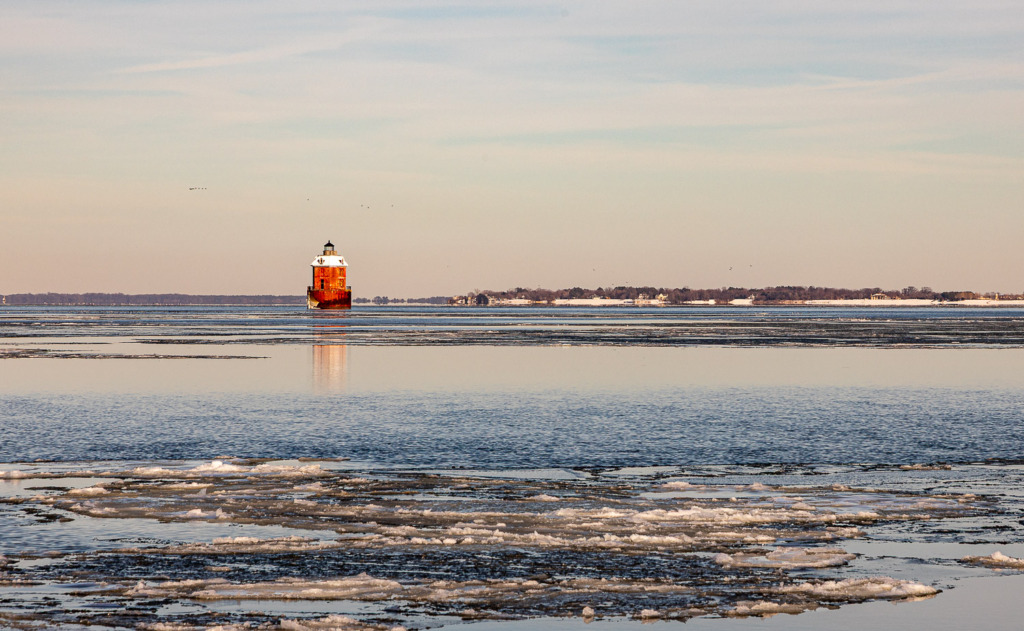
Bright sand at the beach? White overcast sky behind a bird or a lighthouse, like above? They’re the same issue! And you now know how to fix it, whether before or after you take the photo.
And that’s not just snow photography. It’s mastering light.
One Important Warning When You Fix Dark Snow Photos
When you set Exposure Compensation, it does not reset itself, either on your camera or iPhone.
If you leave your camera set to +2 and photograph a birthday party tomorrow…Everything will be blown out.
So, when you’re done shooting snow:
👉 Set it back to 0.
Future You will be grateful.
Now It’s Your Turn ❄️
The next time it snows, try this:
- Escape from Auto Mode.
- Add +1 to +2 exposure compensation.
- Take a test shot.
- Adjust until the snow looks white, not gray.
- Reset exposure compensation to 0 when you’re done.
Then notice how confident you feel. You didn’t just fix dark snow photos. You told your camera who’s in charge! 👏
If this helped you, you’ll love my Quickstart Guide to Program Mode. It walks you through exactly what you can control when you switch to Program Mode.
And if you’re ready to go deeper and really understand how your camera works (without feeling overwhelmed), my Camera Mechanics Workshop was made for you.
Because snow days are magical. And your photos should look that way too. 📷✨
You might also like


Leave a reply